This article will deal with how to create, test, package and import Custom HTML Templates into websites hosted by MyRealPage. This technique will be of special interest to graphic designers, marketing professionals and tech savvy REALTORS® who would like to use unique, hand-crafted HTML behind their websites and still take advantage of the rich collection of MyRealPage weblets.
Custom Template support has been designed to allow you to:
- Create an HTML template for a website on your computer using design tools of your choice
- Create and attach all necessary CSS, graphics, backgrounds using tools of your choice
- Test the HTML locally from your local hard drive and make sure things work
- Package the entire template into a ZIP archive
- Upload and attach the packaged template to either the website's Master Template or any individual page
- Maintain template packages on your computer using techniques you are used to; re-use same templates by adapting them to other websites and brands
What is a Custom Template?
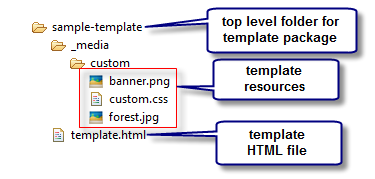
A Custom Template is represented by a fixed folder structure, such as this:

As you can see from the screenshot above, the template package includes
- Top level folder for the template package (e.g. "sample-template"). You can give this the name of your choice
- "_media/custom" folder structure: this folder structure needs to be named precisely
- All template resources, such as images, css, etc can be put into "_media/custom" directory.
- The main template file should be called "template.html" and should reside directly in the top level folder
When the template package is ready to be zipped, simply right-click on the top-level folder and select "Add to [your-template].zip" (I use WinRAR for that):
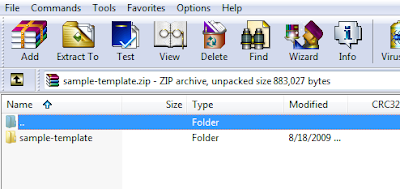
When the ZIP archive is created, if opened, it should look like below, with the top-level folder being the first and the only entry in it. (We thought that this archive structure will make it convenient for you to send and unpack the contents, without worrying to create an intermediate folder):

What's special about template.html ?
The template.html file is a fully compliant HTML file that should be viewable in the browsers that it's designed to support. It contains <html>, <head>, and <body> sections. However, since this file is designed to be a template, a few little things need to be "tuned":
- Insert <!-- BEGIN CONTENT --> and <!-- END CONTENT --> around the portion of the template which should be populated with content by individual pages. Please insert those comments verbatim: exactly in upper case and with only one space between the tags and comment body. Anything between these 2 comments, and including the comments, will be stripped by the import process and that portion of the HTML will be used for content. Make sure tha the comments are located within a "container" element, such as <div>, for example; and that the HTML continues to be valid even with the comments and content between them stripped.
- Make sure that your <head> and <body> tags don't contain any attributes. Both of these opening tags should be inserted verbatim: no spaces, no attributes; but letter case is not important.
- Remove the <title> and any <meta> tags from the <head> portion of the template. Title and meta tags are generated dynamically or configured by the website owner, so don't leave any meta tags that would compete with them (however, you can leave meta tags that describe the copyright for example)
- Don't include any unnecessary javascript. It's likely that importing large javascript libraries may conflict with the website functionality. Check with us if you plan to do that.
- Make sure that all your links and page references, as well as image and resource references in the template are relative.
- Keep in mind that when rendered, each MyRealPage webpage contains a <base> tag. This is important for "#" fragment references. If you test your template with a tag, please remove it before packaging.
How do I apply a Custom Template?
Once, the Custom Template has been packaged into a ZIP archive, you can then go to the "Manage Website" section in the Private Office. In the "Editing" section of the console, you can right click on the Master Template (or a regular page) and select "Custom Template":
- If you are starting from scratch choose "Reset content layout to blank"
- If you want to preserve the current layout with the weblets, then choose "Preserve existing content layout"
- Click "Select Custom Template" and navigate to it in the WebDrive. If you haven't uploaded it; you can upload the ZIP file to any location in your WebDrive
- Once you select the ZIP archive to apply, the system will report whether the import succeeded or not; it will also display errors that occurred if any.
- If import succeeded, continue to double click on the Master Template (or page) to verify that the Custom Template works as expected.
- The content area of the template will contain a layout that can be edited by MyRealPage tools; including the ability to add weblets, etc. The content area will have the same capabilities as "regular" MyRealPage master templates and pages
Watch this video that describes the process:
And a few more things...
Now that you have gotten your feet wet with the Custom Templates, here are a few more things you may want to know:
- Custom Templates on the Master Template will be applied to all pages that haven't been overwritten with a page-specific custom changes. To revert a page to the Master Template, in the Page Editor, click "More..." and "Disable template changes".
- After the Custom Template is applied to the Master Template, each page can be still modified by changing the master layout and/or weblet asortment that belongs to the Master Template to make it different for an individual page. The Custom Template HTML code will still be used from the Master Template
- If you want to create a distinct page that doesn't have the Master Template applied; create a Custom Template for that page (e.g. home page) and apply it directly to that page (e.g. index.html)
- If you applied a Custom Template and then configured the layout and the weblets, but later decide that your Custom Template needs more tweaking; you can re-apply the Custom Template but choose to keep the layout if you want your previous layout and weblets preserved.
We hope you will find the Custom Template support to be your powerful ally! We especially hope that independent graphic designers will find it easy to "port" their existing templates to MyRealPage Custom Template packages.
Brought to you by MyRealPage.com


