Tuesday, August 25, 2009

Custom Templates in MyRealPage Websites

NOTE: Custom templates are now considered deprecated and may not be supported in the future. Instead please use our Custom Layout feature: Custom Layouts can do everything that Custom Templates can, and more: http://myrealpage-alias604.blogspot.com/2010/04/next-gen-layouts-and-templates-go-beta.html

This article will deal with how to create, test, package and import Custom HTML Templates into websites hosted by MyRealPage. This technique will be of special interest to graphic designers, marketing professionals and tech savvy REALTORS® who would like to use unique, hand-crafted HTML behind their websites and still take advantage of the rich collection of MyRealPage weblets.

Custom Template support has been designed to allow you to:
  • Create an HTML template for a website on your computer using design tools of your choice
  • Create and attach all necessary CSS, graphics, backgrounds using tools of your choice
  • Test the HTML locally from your local hard drive and make sure things work
  • Package the entire template into a ZIP archive
  • Upload and attach the packaged template to either the website's Master Template or any individual page
  • Maintain template packages on your computer using techniques you are used to; re-use same templates by adapting them to other websites and brands
What is a Custom Template?

A Custom Template is represented by a fixed folder structure, such as this:
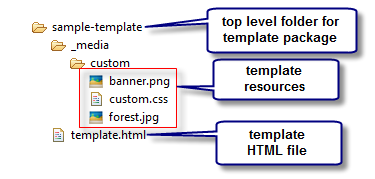
As you can see from the screenshot above, the template package includes
  • Top level folder for the template package (e.g. "sample-template"). You can give this the name of your choice
  • "_media/custom" folder structure: this folder structure needs to be named precisely
  • All template resources, such as images, css, etc can be put into "_media/custom" directory.
  • The main template file should be called "template.html" and should reside directly in the top level folder
When the template package is ready to be zipped, simply right-click on the top-level folder and select "Add to [your-template].zip" (I use WinRAR for that):


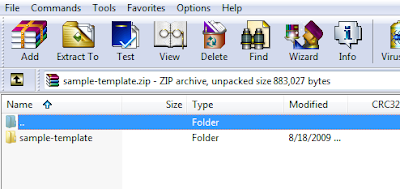
When the ZIP archive is created, if opened, it should look like below, with the top-level folder being the first and the only entry in it. (We thought that this archive structure will make it convenient for you to send and unpack the contents, without worrying to create an intermediate folder):


What's special about template.html ?

The template.html file is a fully compliant HTML file that should be viewable in the browsers that it's designed to support. It contains <html>, <head>, and <body> sections. However, since this file is designed to be a template, a few little things need to be "tuned":
  • Insert <!-- BEGIN CONTENT --> and <!-- END CONTENT --> around the portion of the template which should be populated with content by individual pages. Please insert those comments verbatim: exactly in upper case and with only one space between the tags and comment body. Anything between these 2 comments, and including the comments, will be stripped by the import process and that portion of the HTML will be used for content. Make sure tha the comments are located within a "container" element, such as <div>, for example; and that the HTML continues to be valid even with the comments and content between them stripped.
  • Make sure that your <head> and <body> tags don't contain any attributes. Both of these opening tags should be inserted verbatim: no spaces, no attributes; but letter case is not important.
  • Remove the <title> and any <meta> tags from the <head> portion of the template. Title and meta tags are generated dynamically or configured by the website owner, so don't leave any meta tags that would compete with them (however, you can leave meta tags that describe the copyright for example)
  • Don't include any unnecessary javascript. It's likely that importing large javascript libraries may conflict with the website functionality. Check with us if you plan to do that.
  • Make sure that all your links and page references, as well as image and resource references in the template are relative.
  • Keep in mind that when rendered, each MyRealPage webpage contains a <base> tag. This is important for "#" fragment references. If you test your template with a tag, please remove it before packaging.
How do I apply a Custom Template?

Once, the Custom Template has been packaged into a ZIP archive, you can then go to the "Manage Website" section in the Private Office. In the "Editing" section of the console, you can right click on the Master Template (or a regular page) and select "Custom Template":
  • If you are starting from scratch choose "Reset content layout to blank"
  • If you want to preserve the current layout with the weblets, then choose "Preserve existing content layout"
  • Click "Select Custom Template" and navigate to it in the WebDrive. If you haven't uploaded it; you can upload the ZIP file to any location in your WebDrive
  • Once you select the ZIP archive to apply, the system will report whether the import succeeded or not; it will also display errors that occurred if any.
  • If import succeeded, continue to double click on the Master Template (or page) to verify that the Custom Template works as expected.
  • The content area of the template will contain a layout that can be edited by MyRealPage tools; including the ability to add weblets, etc. The content area will have the same capabilities as "regular" MyRealPage master templates and pages
Watch this video that describes the process:


And a few more things...

Now that you have gotten your feet wet with the Custom Templates, here are a few more things you may want to know:
  • Custom Templates on the Master Template will be applied to all pages that haven't been overwritten with a page-specific custom changes. To revert a page to the Master Template, in the Page Editor, click "More..." and "Disable template changes".
  • After the Custom Template is applied to the Master Template, each page can be still modified by changing the master layout and/or weblet asortment that belongs to the Master Template to make it different for an individual page. The Custom Template HTML code will still be used from the Master Template
  • If you want to create a distinct page that doesn't have the Master Template applied; create a Custom Template for that page (e.g. home page) and apply it directly to that page (e.g. index.html)
  • If you applied a Custom Template and then configured the layout and the weblets, but later decide that your Custom Template needs more tweaking; you can re-apply the Custom Template but choose to keep the layout if you want your previous layout and weblets preserved.
We hope you will find the Custom Template support to be your powerful ally! We especially hope that independent graphic designers will find it easy to "port" their existing templates to MyRealPage Custom Template packages.

Brought to you by MyRealPage.com

Monday, June 29, 2009

FAQ: MyRealPage iPhone and Android mobile listing application

I wanted to post a few Frequently Asked Questions here as a resource for those interested in the our iphone / android listing searches. I will fill in as more questions arise. Feel free to ask your own in comments!

If you haven't seen the official release for this product, please visit MyRealPage Listing Search hits iPhone and Android

Q. How does your mobile listing application work?
A. It works by entering a URL (web link) into the phone browser. The URL for this application can be obtained from one of the realtors® who have MyRealPage listings subscription.

Q. What phones does it work on?
A. The mobile search works on iPhone (OS update 3.0) and Android based phones ("Cupcake" build), such as HTC Dream or Magic (Android phones are also often referred to as "google phones")

Q. I am a MyRealPage customer, how do I access my mobile search?
A. The easiest way to get the URL (web link) to the mobile search is by visiting your public search page. We have included a link at the bottom of the page which will open a special "Mobile Inquiry" form and send you the URL to the email address of your choice. This is particularly handy for the smartphone users as there is no need to type in the URL manually: simply tap on it in your email on the phone. The "Mobile Inquiry" form is also designed to generate interest in the public that visits your website and, in turn, generate leads for you. Every request through this form will create a "quick lead" link which you can use to create a lead with one mouse click. After you opened the mobile search application, you can save it to your Home Screen: read a few entries below on how to do that.

Q. I am a MyRealPage customer, but I don't see the link you mentioned.
A. Please note that this application is only available in regions where the local Real Estate Board authorizes "public searches" (i.e. Reciprocity program). We would love to offer it in your region as well and we will, as soon as your Real Estate Board allows it.

Q. Is it free?
A. The application is currently in beta and will be available for free while it remains in beta. We plan to keep it in beta for at least a few months until we mature this product and understand the mobile space better.


Q. I would like offer this application to my clients, but I am not a customer with MyRealPage. Do I need to switch my website provider?
A. The short answer is "no": you don't need to move your website to MyRealPage. Although, we would love to provide you with both the website and the listings solution, you are also free to keep your website where it is and purchase the subscription to "listings only". This subscription will give you access to the mobile search. Hence, for example, if you are a Point2 customer and would like to keep your website, you can opt to use only the mobile application and frame the whole listings solution from MyRealPage into your Point2 website: there are MANY features you will get from our listings offering, including public MLS searches and Virtual Office Website (VOW) tools.

Q. Are you planning to release a Blackberry (or "X" phone) version of this application?
A. We have built this application using the technologies which are currently available only on the iPhone and Android phones (feel free to correct me on this technical point). In fact, these features are only a few months old. Currently, the Blackberry, Windows Mobile, Symbian OS, etc. will need a special type of application built for them: of course, if and only if, the application on these platforms were to have the same feature sets as the iphone/android application: i.e. be geo-location and map based. We are currently looking into the Blackberry version of this application and we'll post an update on this when we have more information.

Q. Why doesn't iPhone locate me correctly? Sometimes, it shows me a few blocks off from where I really am.
A. MyRealPage application depends on the iPhone to provide accurate GPS location. Sometimes, this location is not accurate enough. We discovered that there is a quick and easy work around: simply press "Follow Me" button and wait a few seconds: the phone should come up with better location and then you can simply press "Un-Follow".

Q. How can I check listings that are far away from where I am?
A. Simply use "Set Location" button and enter an approximate address, such as a street or location in the city. Don't forget to include your city and province (just in case). The application should locate that address and show you the listings around it. You can "pan" the map by moving it around just like you would on your home computer. The listings should update as you "pan". You can also force the application to search the listings in the current map rectangle by pressing "Search" button.

Q. How can I add this application to my iPhone / Android home screen?
A. When in application, simply press on the "+" on the iPhone on the bottom toolbar and then Select "Add to Home Screen". A similar process of "Bookmarking" and adding the Bookmark to the home screen will apply to Android phones.


Monday, March 23, 2009

FAQ: All About Listing Photos

We thought to adopt the Frequently Asked Questions (FAQ) format to write about the many options available to our Listings users as far as the listing photos are concerned. MyRealPage provides fully automatic listings for most of its clients and these include automatically imported photos. The challenge then becomes to both let the users benefit from the automatic photos and let them upload custom better quality ones to maximize the visual impact of their listing presentations. Hopefully, the following FAQ will help you better harness the power of your listing photos. (If we missed a question you would like answered, please leave a comment to this blog post). You can also find the original official release of many of the features listed below on the MyRealPage Corporate Blog.

Q: I am fine with my automatic photos, but I would like to add more photos as my Real Estate Board only allows a limited number.
A: You can easily add any number of photos to your existing automatic photos. All photos you add will be marked with the small "m" symbol in the top-right corner to indicate they they are manual. You can also re-order the photos, if you would like, for example, to make one of your manual photos the first, and hence, the feature one.


Q: How do I change the order of the listing photos?
A: Simply click on a photo and drag it until it's in the right position. Ctrl+click allows you to select several photos at a time.

Q: I have re-ordered the photos and added manual ones. What will happen now when my listing is updated by the Real Estate board?
A: We will  preserve your ordering and your manual photos. If the listing update included new images or all the images have been replaced by the Real Estate board update, they will be added to the end of your custom photo order. If you would like to be even less dependent on the Real Estate board modifications of listing photos, consider disabling automatic photos altogether (see below).

Q: Some of my listings are co-listed with other agents. How will my manual photos and re-ordering affect the other co-listing agents?
A: Your photo order and your manual photos will have no effect on how this property displays on the co-listing agent's website (even if the co-listing agent is also the customer of MyRealPage).

Q: I don't like the automatic photos. I have better quality, better resolution photos and I would like them to replace the automatic ones.
A: You can easily disable the automatic photos by simply clicking on the "Disable Auto-Imported Images" at the bottom of your "Photos" tab in the Private Office listing editor. By disabling the auto-imported images, you are fully in control of all the photos. HINT: even after you disabled the automatic photos you can still drag-and-drop any of them from the "disabled" section into your "live" photos.


Q: I would like to get rid of some borders and unwanted artifacts in my photos. Can I do that right in the Private Office?
A: Yes, we have integrated an online image editor so you can edit the listing photo right "in place". You can edit manual listings only, but the good news is that our system can instantly convert all your automatic photos to manual and let you freely edit them.


Q: I have seen "New Listing", "Sold", etc banners on my listing photos. Do I have any control over them?
A: Yes, you have full control over the listing banners. If you go to the "More..." tab in your Private Office listing editor, you will see this little screen:


Here, you can choose to altogether disable the banners, let the system decide, or, best of all, provide your own banner. The banner will appear in all listing views, including the listing gallery. It's a great way to draw attention to your listing.

Q: Can I pick another photo gallery to showcase my listing photos?
A: Yes, you currently have 6 photo galleries to choose from: 2 based on javascript and 4 based on flash. You can change your default gallery by going to "Options" in the Private Office listings, and scrolling to "Graphic Options". You can also assign a different gallery for when it's opened from the list view ("Search Results") and from details view.


Q: Listing Galleries appear very "rich". Are my photos going to be visible to visitors without javascript and/or Flash? What about Google and other search engines?
A: Yes, we have gone to some length to make the listing photos "degrade" gracefully. This means that we include image links to your photos that are visible to the search engine bots but are not visible to users with javascript enabled. Also, if the user opens a gallery which requires Flash and they don't have it enabled, they will be presented with a choice of either installing Flash or viewing a simpler javascript gallery. And those users who don't have even javascript enabled will still be able to access the photos via direct image links, just like search engine bots.

-------------------

Listing photos create a very visual and attractive way to showcase your listings. By taking advantage of these new and improved features provided by MyRealPage, you can boost your listings' visibility and attract more attention; and we hope this attention will translate into more business for you.

Sunday, March 15, 2009

Animoto: video presentations without video camera or software

Animoto is a very interesting service which allows you to create very dynamic and professional quality video presentations simply from listing photos. After you upload your photos and pick a soundtrack, Animoto goes to work to create a unique video presentation; in fact, it's different every time you use the same photos and sound, so clicking "Remix this video" will produce a different presentation.

Animoto has a special section for real estate (http://animoto.com/business/realestate) which specifically targets real estate professionals. The service has a free and paid subscription model. Unfortunately, you will probably find that the free service will not be sufficient to produce high enough quality videos but it's a good starting point to experiment with this service.

Once you create a video, you can choose to download it and then use the downloaded file to syndicate your video, embed it in your listing's video or virtual tour section, or feature it on your bolog or website with MyRealPage.

As an example, here is a sample video we created from professional photos (by fotographix.ca):


Home for your videos on Fliggo

If you read our previous posts, then you already know how to use TubeMogul to syndicate your videos to multiple social video sites, such as YouTube, Viddler, Revver, Metacafe, Blip.tv, etc. All of these social video sites allow you to share your videos and embed them in your blog or website with MyRealPage. But you may have also noticed that most of these sites include advertising in your videos, some of them restrict commercial content and you may have limited options if you ever wanted to brand and manage your own "channel": the little place where all your videos could be viewed, browsed, searched, and commented on separately from the rest of the larger site (for example, are "Related Videos" always what you would want them to be?).

Enter Fliggo! Fliggo is a new startup which aims at allowing its users to create personalized individual video websites and configure them to their liking. 

It's easy to get started with Fliggo: just watch their introduction video by clicking "Watch the demo" button on their front page. Once you sign up, you will automatically have a "[your-username].fliggo.com" domain. It appears that a paid subscription is also in the works for a premium service: $15/month, which would include your own custom domain. You will also notice that you have a dedicated website just to your videos. 

When logged in, you should check out the "Dashboard", and especially the "Add-Ons". There you can freely enable such things as:
  • Sharing (necessary for video embedding)
  • Categories
  • RSS Feed
  • Comments
  • and other...
Under "Settings", you can specify whether this website will have moderated comments (i.e. you will need to approve them), whether it will have "open" membership and you can even specify your own Google Analytics ID to track traffic.

Under "Customize", you can change your theme and upload your logo or photo.

Our first impressions of Fliggo are excellent. Keep in mind that this is a fairly new start-up and that Fliggo's advertising policies may change too; but we thought you may want to experiment with this interesting service. It would be like having a dedicated home for all your videos and you can use it to embed videos into your blog or website with MyRealPage as well as videos or virtual tours in your listings, and not worry about 3rd party logos and advertising in your videos. Of course, having a place on Fliggo doesn't mean that you should stop syndicating your videos; you may simply use Fliggo as the "real" home for your videos and you can link to it from your website and advertise and promote it; especially since it's absolute free.

Monday, February 2, 2009

Connect your Blog with MyRealPage to Facebook

 
UPDATE: It appears that Facebook has discontinued this feature. However, you can still deliver your RSS feeds to Facebook by using 3rd party syndication services, such as Dlvrit: http://dlvr.it We have successfully tried Dlvrit and made it work with Facebook: it’s pretty straightforward and easy.

If you are active on Facebook, you may choose to connect your blog which you maintain on your website with MyRealPage, to your Facebook Notes section. This will ensure that your blog postings automatically appear there, including automatically generated listing blog posts. It's very easy to connect your blog with MyRealPage to your Facebook account: you simply need to import your blog's RSS feed into Facebook. Your blog is automatically equipped with RSS feed by MyRealPage. The whole process looks like this:
  • Start by logging into your Facebook account, and locating your Applications section:

  • After you click on Notes, you will be able to select "Import a Blog"...


  • At this point switch to another browser window, navigate to your website, locate your Blog, right-click on the RSS feed link, and select "Copy link address":
  • Back in the Facebook screen, paste the link into Web URL field, and continue:


  • On the next screen, you will be able to preview your blog posts and "Confirm Import":


  • You are done! Under your "Notes", you will see now your blog posts:


We hope you will find this post useful. Remember that RSS is a standard way of making your blog posts available to other web services. For a quick primer on RSS and feeds, read this post. If you would like to publish your blog to another service, try googling for "RSS and [your service]". Chances are: you will find what you are looking for. As an exercise, try "MySpace", for example.


Sunday, January 18, 2009

Show your Twitter Feed on your Website with MyRealPage

Twitter is a great tool to create and maintain large social networks. If you, like many others, have "discovered" Twitter and it became part of your daily online life, you may be interested in connecting your Twitter Feed to your website with MyRealPage.

There are a number of "widgets" which can be found on Widgetbox (http://www.widgetbox.com) that show your latest posts from your Twitter Feed. These widgets can be easily incorporated into your MyRealPage website by simply copying and pasting a code snippet.

Below is a video which demonstrates just how to do that. In the end, we will achieve the effect shown in the screenshot below:


Watch this video to see how to achieve this effect:


Hint: MyRealPage also provides a "News Weblet" which can read any RSS Feed (Quick Primer on RSS here) and display results (including randomizing them) on any of your pages. Well... Twitter gives you an RSS Feed which you can easily find on your home Twitter page. Why not try and experiment by connecting your Twitter RSS feed to MyRealPage News Weblet and see your latest tweets in their full glory on your webpage. If you would like a separate HOWTO on how to achieve this, vote on this blog by posting a comment!

Publish your MyRealPage Blogs to Twitter

Twitter is a great tool to create and maintain large social networks. If you, like many others, have "discovered" Twitter and incorporated it into your daily online activity, you may want to see how much closer you can bring Twitter to your MyRealPage website.

This post will explore publishing updates in your blog on a MyRealPage website to your Twitter account.

Twitter allows you to publish up-to-140-character-long messages that describe "what you are doing". Wouldn't it be great, if you could use Twitter to automatically announce that you have published a new blog posting. Or even better: since MyRealPage provides you with automated blog postings for your listing activity, such as New Listings, Sold Listings and Open Houses; wouldn't it be great if those posts could also make their way into your Twitter stream. That's precisely what you can achieve by connecting your blog feed to your Twitter account.

To connect your blog RSS feed (read a short primer on RSS and feeds here) to your Twitter account, use a great free service provided by TwitterFeed (http://www.twitterfeed.com):


  1. Create a TwitterFeed account. You can create a new account or use your GMail username/password to login (don't worry, twitterfeed will not know your password, it will use an OpenID protocol which Google participates in. In fact, we highly recommend that you create a GMail account, as it gives you access to a whole bunch of other Google services which you can find very useful).
  2. Go to your website's Blog page and locate the RSS Feed icon. Right-click on on it, and select "Copy Shortcut":
  3. In TwitterFeed, create a New Feed and populate the fields. This is what my screen looked like after it was filled out:


  4. If you choose to update every 30 mins, then you may want to grab a cup of coffee until TwitterFeed runs your first update. After about 30 mins, you should see something like this show up in your Twitter account (provided, of course, you have some content in your Blog):


A couple of hints are in order here:
  • If you find that your automatic listing blogs don't produce a well reading entry in Twitter, you can customize your Automation blog settings for your listings so that they produce most of the information in the first 140 characters and the posts become meaningful in Twitter. To customize your Automation templates, go to "Blogging->Automation" and click on appropriate "Edit Template" link next to New Listings, Sold Listings, and Open Houses.
  • You can choose to use "Prefix each tweet with" field by entering something like "New Blog post:" to make your regular blog posts more meaning too. Experiment!

Monday, January 12, 2009

FeedBurner: Supercharge your Blog!

If you are serious about blogging (and you should be), you should consider using FeedBurner. FeedBurner is a special blog-enhancing service which is available for free from http://www.feedburner.com. It is designed to promote and enhance your blog and provide you with accurate statistics about your blog subscribers.

The video included in this blog will introduce you to how to "hook up" your MyRealPage blog to the FeedBurner and will explore a few useful features provided by FeedBurner, such as:

  • PingShot
  • Email Subscription
  • Feed Integration with MyRealPage

Feedburner's PingShot will scan your blog for updates and "ping" well known blog aggregators about changes in your blog. It's a great way to tell the world that you have news.

Email Subscription form is a useful tool which can be easily embedded anywhere you like on a blog page in your MyRealPage website. It will notify your web visitors about updates in your blog.

Lastly, in order to allow FeedBurner to collect and report accurate statistics about your subscribers, MyRealPage can be instructed to redirect all subscription requests to FeedBurner. This feature is explored in the last section of the video.

These are, by no means, all the features provided by the FeedBurner. Invest some time and learn what it offers (hint: take a look at embedding "Publicize->Chicklets", "Optimize->FeedFlare"). Start slow and experiment! 

A hint: to embed various widgets from FeedBurner, use the example of Email Subscription from the video; i.e. use the "Html Markup" weblet: it's the easiest way to paste a code snippet into your web page.


Saturday, January 10, 2009

RSS, Atom, Feeds: A Quick Primer

In the course of your online adventures, you may have already come across such terms, as "RSS", "Atom", "Syndication Feed", and others similar. You may have wondered what they meant and why you needed to care about them. The explanations for these terms are freely available on the web and are easy to find. I have put together this quick primer to skip over the technical details, but instead to try to convey to a non-too-tech savvy user what sort of technology these terms stand for and why they are important in today's web. I have also wanted to do this to "soften" some ground for the next few HOW-TO installments in this blog, as most of them will deal with RSS in some form or another.

For a regular user, the differences between RSS and Atom are not important. What's important is that both are standards regarding how to format a "List of Items". The format says how to describe the "List" itself, and then each "Item". This formatted List then can be accessed through a URL, usually by clicking on that well-recognizable symbol (and very much like any regular web page).

The "List" information, among many other things, should contain:
  • Title
  • URL of the website where the List originates
  • Published Date
  • Author

Each "Item" information, among other things, should contain:
  • Title
  • Description (can include images, video, etc)
  • URL of the website where the Item can be found
  • Published Date

Pretty simple, isn't it? Ok, let's try to see how many different types of information these formats can easily describe.

1. Can they describe blogs? Sure, and that's what they are used for a lot! Each blog posting ("Item") can be easily described through a Title, Description, URL, and Date. The blog itself ("List") can be also described through a Title, URL and Date. (In case you are wondering, your MyRealPage Blogs automatically get RSS feeds).

2. How about your Property Listings? Yes, actually. Your listings are obviously a "List" (even if there is only one or no listings). Each listing can also be easily described through a Title (say, listing's addess), Description (listing's details), URL (where to find the full web page on the listing).

3. How about your Testimonials? Hm, yes, indeed. You can easily apply the logic from the listing to describe a Testimonial: a Title can be the happy customer's name, Description can the content of the Testimonial, and the URL can be either skipped or point to your Testimonials page on your website.

4. So, how about, favorite quotes, cooking recipes, useful links, reports? Yes, and you should get the picture by now.

So, the next question is why should you care about all this?

Well, simply put, both RSS and Atom are a great way to read and stay up to date with changes in a particular "List". Most modern browsers will allow you to access an RSS or Atom feed directly and display well formatted results too! Every time you refresh, you get the updated list. Browsers find it easy to read these feeds because they "understand" the format, for example, they know where each "Item" begins, where each "Description" is, etc.

Then, enter Feed (RSS) Readers... These allow you to organize all your favorite feeds in one place, much alike favorite links in your browser, and the Feed (RSS) Reader will update all of them when you click to see new updates.

If you are interested, I strongly encourage you to check out Google Reader (http://www.google.com/reader). It will display all your feeds in a web page, and I even use it on my phone. If you already have a gmail account, you can start using it right away. If not, create a google account; it's very quick and simple. Google Reader is a great way to start experimenting with feeds or to organize your existing ones. (As an exercise, try to add this blog to your new Google Reader account, if you don't have one yet).

Stay tuned to the next few installments on this blog, as well as MyRealPage Company Blog http://www.myrealpage.com/blog.html too. They will be exploring the RSS in a traditional, and not so tranditional way.
www.myrealpage.com

MyRealPage: Tech Blog
Subscribe in a reader